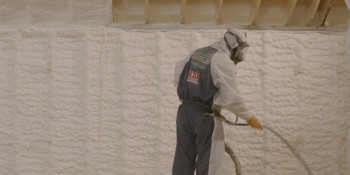


Testing for Quality Foam Insulation During Field Application
Most sprayfoam applicators do a great job installing good quality polyurethane foam. With quality installation and a great product the SPF industry continues to grow despite a down economy and construction industry. However, like any building services trade, if you do not choose a skilled applicator with proper training and quality control experience, issues with poor quality and future performance can occur. For example, improperly installed off-ratio and off-spec foam can result in foam shrinkage and cracking.
This is in no way a negative aspect of spray foam. SPF is indeed a superior green building and insulating material. It is purely a message to both the consumer and the future installers of our industry that just because a company has purchased equipment and claims to be a spray foam installer does not mean they are any good at it.
This is purely a matter of selecting good quality foam contractors and installers, checking references and making sure they are properly trained and experienced at the work they are doing. Similar performance issues commonly occur with the poor installation of any building material and alternative insulation products such as fiberglass insulation, and Tyvek® housewraps. If they are not installed by trained professionals, they are probably not going to perform as well as they should, or could.
I have visited two job sites in the last 3 months where the foam has shrunk back away from the studs - more than 3 inches and has cracked along in other areas. The applicators tell me they installed the foam according to manufacturer’s instructions and it looked fine to them. Within a few days or weeks however, the foam started to shrink and crack.

Shrinking SPF pulling away from studs
So what is going on and how does a contractor know if a seemingly good looking foam job will potentially go bad?
In order to understand how to tell good foam from off-spec foam the contractor needs to have an understanding of the physical properties for the different types of SPF. SPF manufacturers test their products in laboratories to obtain physical properties that are then reported on their data sheets such as (but not limited to) density, compressive strength, R value, dimensional stability, permeance, water absorption, adhesion, etc.
Standards developed by the SPF industry, code bodies and standards organizations (such as ASTM) describe the physical properties required for different SPF types and applications.
For example, the following table from ASTM C 1029 provides physical properties required for 4 types of closed cell SPF:
Property |
Requirements |
|||
|
|
Type I |
Type II |
Type III |
Type IV |
|
Thermal resistance of 1.0 in. (25 mm) thickness, min, °F·ft2·h/Btu (K·m2/W) at mean temperature 75°F (24°C) |
6.2 |
6.2 |
6.2 |
6.2 |
|
Compressive strength, at yield or 10 % deformation, whichever comes first, |
15 (104) |
25 (173) |
40 (276) |
60 (414) |
|
Water vapor permeability, max, perm-inches (ng/Pa·s·m) |
3.0 (4.4) |
3.0 (4.4) |
3.0 (4.4) |
3.0 (4.4) |
|
Water absorption, max, volume % |
5 |
5 |
5 |
5 |
|
Tensile strength, min, psi (kPa) |
20 (138) |
32 (221) |
42 (290) |
56 (386) |
|
Response to thermal and humid aging, max, linear change % |
12 |
9 |
6 |
5 |
|
Closed cell content, min, % |
90 |
90 |
90 |
90 |
|
Surface burning characteristics, report value |
report value |
report value |
report value |
report value |
In this table, the SPF is categorized primarily by compressive strength. Types I & II range in density between 1.5 to 2.2 lbs/ft3 and are most often used as insulation and air barriers inside a building. Types III and IV range in density between 2.5 to 3.5 lbs/ft3 and would be used for roofing or other exterior SPF applications.
Low density SPF does not currently have an ASTM standard (a task group has been formed to develop one), but is covered under the International Code Congress Evaluation Services Acceptance Criteria 377 on Spray Polyurethane Foam.
Of the physical properties listed only compressive strength can be tested in the field and even that would vary from laboratory tests. So, what information can field tests and observations provide? Enough to verify the foam is within manufacturer's specs and should perform as advertised. Such as:
- Compressive strength (est.)
- Adhesion to substrate
- Cell uniformity
- Off-ratio or poorly mixed foam
- Wet substrate, cold or contaminated substrate
- Foam density (est.)
How to obtain the information:
First thing an applicator needs are the right tools to perform quality control observations and testing.
Tools:
- Moisture meter: (Delmhorst Moisture Probe)
- Core sample tool (2-3 inches in diameter, pipe sharpened on one end with a plunger to extract the sample)
- Scale (sensitive enough to weigh grams and fractions of ounces)
- Compressive strength tester (such as Com-Ten)
- Optical Comparator (Edmunds)
Pre-installation Quality Check
Step 1. Verify the foam quality.
Before installing SPF to the target substrate, spray a test on a clean dry substrate around 70-85 degrees F. Allow it to dry and set for a few minutes.
- Test compressive strength: Check the compressive strength of the foam with the Com-Ten tool. (Note: An experienced foam applicator can typically tell within 5 psi the compressive strength of the foam.) Medium density foam should between 15 to 25 psi and low density foam between 2-5 psi. If the foam is softer or harder than this, it is an indication of an off-ratio or poor mix.
- Confirm adhesion: Using a coring tool remove a sample and determine the relative adhesion quality of the foam. If the foam is hard to remove and leaves little bits of foam on the substrate it is called cohesive foam failure and is considered the best adhesion. If the foam comes away from the substrate with some force but is clean, it is called a mechanical bond. If it comes away easily from the substrate, the adhesion is poor. Cohesive foam failure and a good mechanical bond are acceptable.
- Conduct a visual observation of the foam cell structure and quality. The foam should have a consistent and fairly uniform cell structure and color. Look for variations in color, cell formation, voids, cracks, high density skins next to the substrate, and other anomalies.
Step 2. Spray a test section:
- Measure the temperature and moisture of the target substrate to verify it is within manufacturer’s recommendations.
- Spray a section of foam approximately 2’ x 3’ (or between studs 2-3 foot in length)
- Obtain a core sample and check compressive strength, adhesion and observe foam cell properties following the procedures above
- Record results on daily job log.
Step 3. If foam is OK, begin spraying.
Quality assurance during Application:
Just because the foam was fine when you started doesn’t mean it will stay that way all day. Temperature changes, balky transfer pumps, trashy material and a host of other problems can wreck your foam. Periodically throughout the day, take a core sample of foam and watch for problems. It doesn’t have to be a formally documented sampling, but examine the foam for poor physical properties. Your foam’s compressive strength and density should remain fairly constant throughout the day. If it varies more than 5 psi, there could be dimensional stability problems that would reveal itself in cracked or shrinking foam.
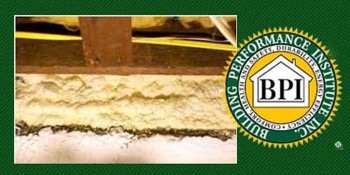
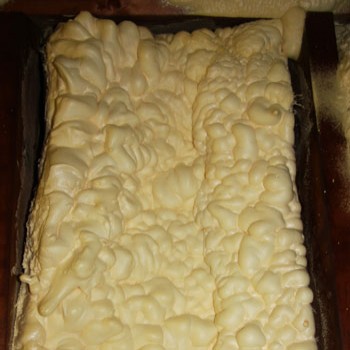
What does poor quality foam look like?
Foam should have a consistent cell structure without significant color changes, cell deformation or other anomalies.

For example this foam sample of low density SPF shows a large void and delamination near the substrate. The supplier attributes this problem to a cold substrate.

Note the dark colored layer of foam. This layer exhibited very high compressive strength indicating iso-rich foam (A-side). This was caused by cold resin (B-side) material

This foam was sprayed on a wet surface with predictable results: soft foam with poor adhesion.
We at SprayFoam.com have been on job sites in the winter months where low density foam was sprayed directly to the external plywood sheathing. It was very cold. When the hot foam (125F temperature + exotherm) hit the substrate, condensation was formed and the entire foam pass in the stud set-up, then fell right out of the stud cavity. The foam was good, the wet surface from condensation provide for no adhesion.

Note the foam shrinkage at the edges and top of the stud wall cavity.
Foam Spray Testing Tools

Delmhorst Moisture Probe, coring tool and pen knife for slit samples and field compressive strength tester.
Mason Knowles utilizes more than 37 years as a contractor, spray foam and coating manufacturer, equipment manufacturer, technical trade association professional and code/regulatory advocate to provide contractors and suppliers consulting services designed to make their business more productive, cost efficient, profitable and responsive to customers' needs and the environment.
See the Business Behind the Story:
Disqus website name not provided.